I was thinking about how to do this using laser cutting. My most ambitious goal was to use only flat laser-cut pieces that would fit together as long as thickness was kept precise. I still think this is possible, but a more practical approach may be using two flat pieces per Margolus tile and gluing them together, top and bottom, so that the bottom would fit the groove in a previous layer and the top would create new grooves offset by diagonals in between the tiles (this will be clearer with a picture).
The pieces need to be 90° rotationally symmetric relative to the rules they represent, but unambiguous so you can't flip them and get a new rule. Ideally the tile set would not permit a piece to be fitted into another with a hidden gap (this may not be mathematically necessary in a tiling, but helps to avoid human error in placement). I state all this in an attempt to explain some of the shapes below. There might be something better, but I'm content with these for now. (Enough that I may put in a laser cut order once I'm convinced it works.)
This shows the six rules up to symmetry for Critters (the form in which "vacuum" oscillates between 0 and 1). From left to right are the transitions, shown with black and white squares, the outline of the bottom tile, the outline of the top tile, and my attempt at a 3D picture of what this could look like with a semi-transparent top tile (I used some Inkscape tricks to get these and I think the results are OK but I'm sure a CAD tool could do better).
The correspondence between the black and white squares and the tiles should be clear and is left as an exercise. Black and white (0 and 1 respectively) are represented using two different tile contours.
Finally on the right is an example of how a tile would fit into a groove going layer to layer.
- g14571.png (92.62 KiB) Viewed 1469 times
The 12 shapes of tiles are "universal" for symmetric Margolus CA, but to get a particular CA rule, you have to glue them the right way. I think this is a pretty fast process, though obviously it is a manual step. Alternatively, I imagine a 3D printer could handle these shapes easily (but I have no experience with that and was really interested in what I could get by cutting).
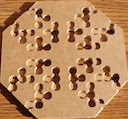
Here's run through of the 4 steps of a Critters spaceship with tiles, i.e.:
Code: Select all
x = 3, y = 5, rule = critters
$bo$2bo$2bo$bo!
- rect6426-7-32.png (54.84 KiB) Viewed 1469 times
A "proof of concept" would be a tile set that could be handed to someone who knew nothing about CA or Margolus neighborhoods and might be quite surprised to find contours moving around. It requires only a few tiles just to get a single spaceship through a full period. I think with several hundred tiles (since each has 4 CA cells) it might be feasible to build non-trivial oscillators without finding the process too tedious.
Update: For truly flat pieces without extra gluing rules, it should suffice to make pieces that can be rotated 90° from the plane to fit in holes that match tile thickness. This is problematic, because the pieces are small (or at least skinny) relative to the main tiles, but something like the following would allow unambiguous "receptor" holes to be cut through tiles, would not fall through, and would fill gaps completely. t is the tile thickness, and w is the smallest width we allow in the material (since it becomes very fragile otherwise). The gray rectangles show how holes would be cut into the main tiles to fit these pieces.
- g1071-5.png (6.37 KiB) Viewed 1425 times
Update 2: To clarify, my original intent was to use s-shaped pieces like the above to form inputs and outputs on a single tile, though I got frustrated working out the spacing. Another idea is to combine them with the tiles above as virtual glue. Simply pick out the input and output tiles for your CA rule and place matching receptor holes on them. Then each transition is realized by placing a tile to fill in a gap, placing an appropriately size s-shaped piece in its hole, and matching it with the tile for the next layer. There may be simplifications, but in its most straightforward implementation, you would just need to add 6 new s-shaped pieces. So instead of any gluing instructions, the tile set itself would determine the rule.
Update 3: Here's a better 3D view of the tiles in tinkercad: https://www.tinkercad.com/things/ff8gb1ONEfb-margolus